
python 多线程与多进程
概述
与线程相关的标准库模块
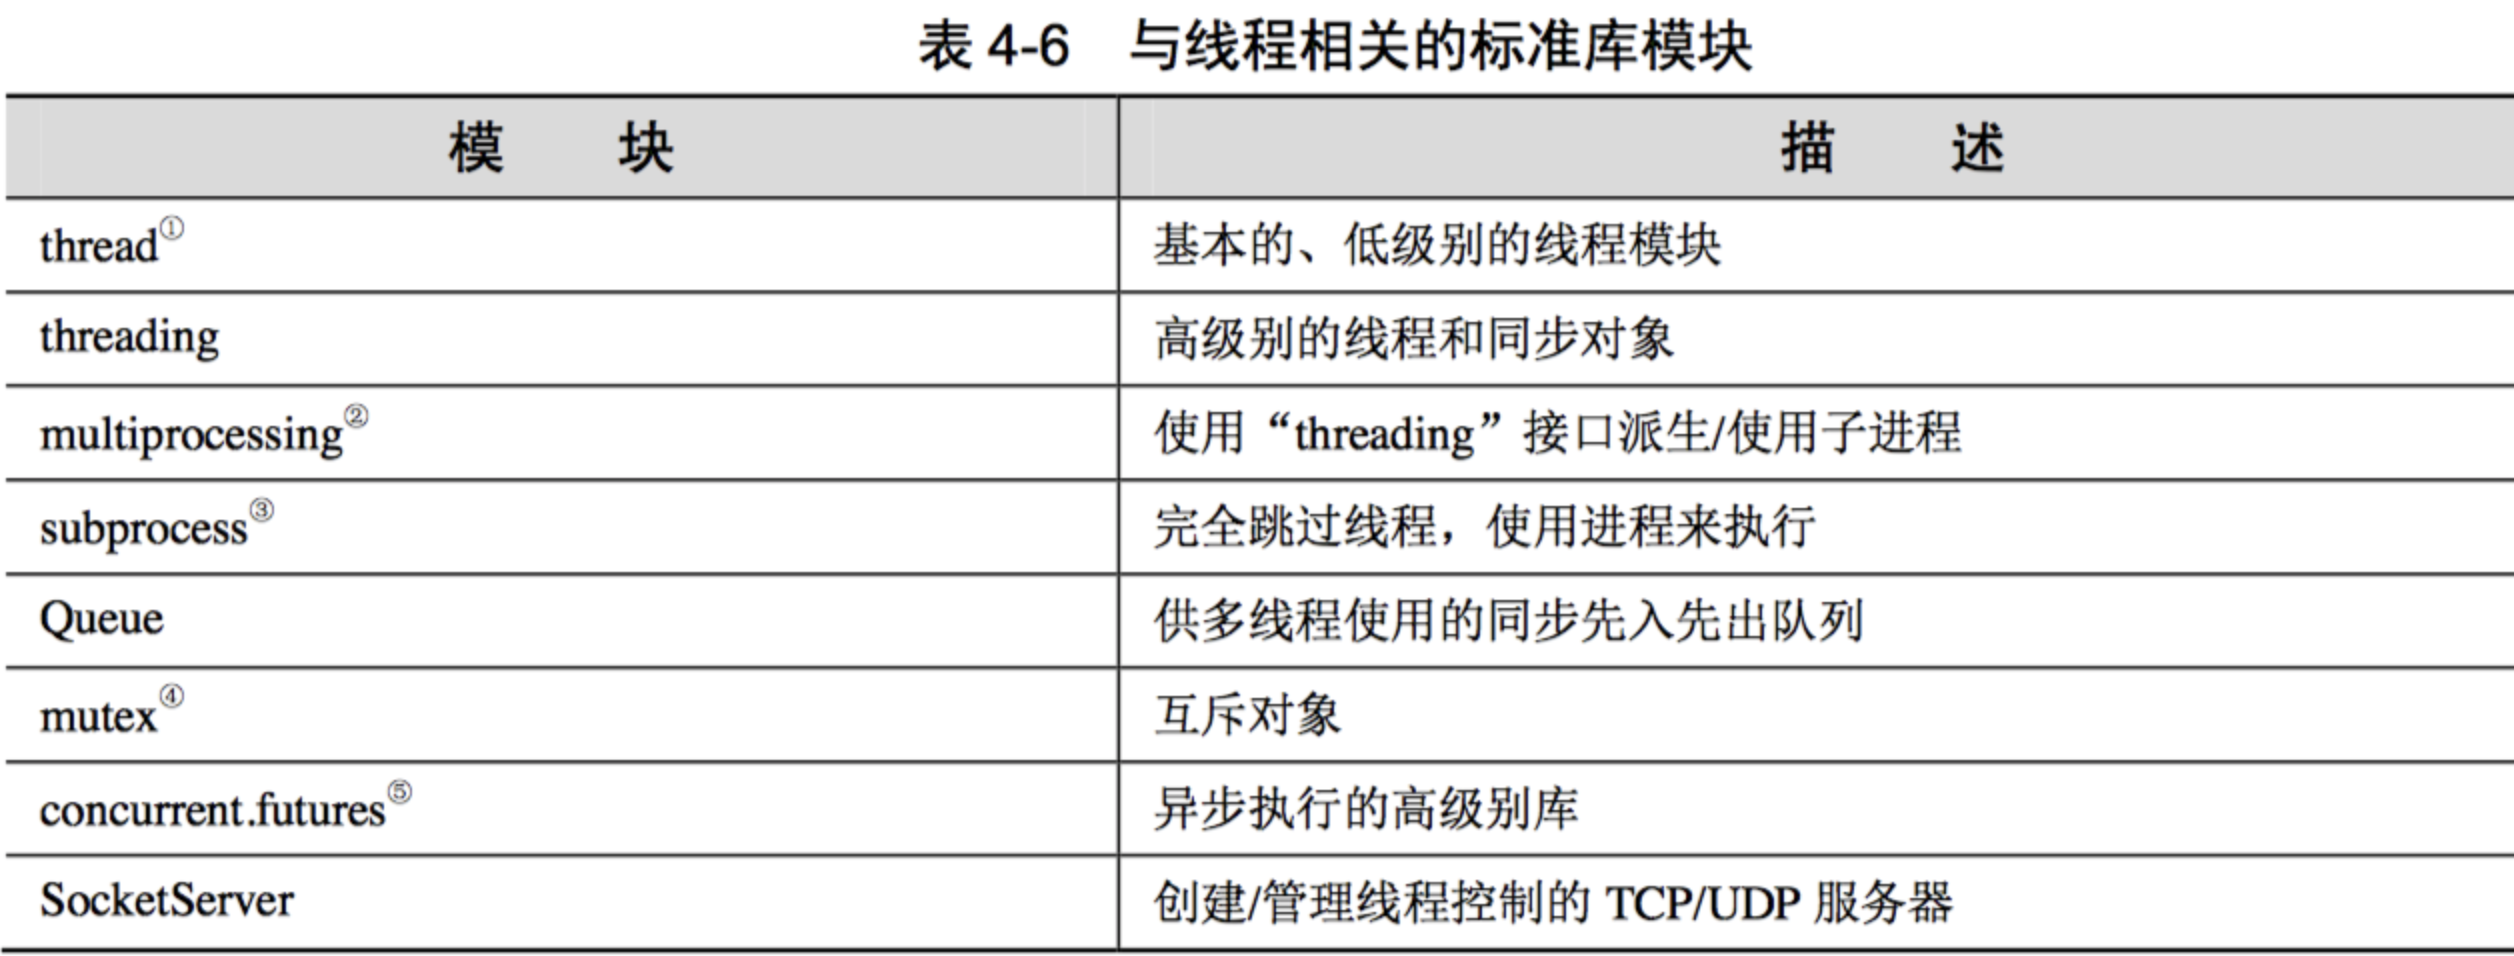
线程实现
方式一,定义线程函数,实例化Thread类(简单)
# Code to execute in an independent thread
import time
def countdown(n):
    while n > 0:
        print('T-minus', n)
        n -= 1
        time.sleep(5)

# Create and launch a thread
from threading import Thread
t = Thread(target=countdown, args=(10,))
# t = Thread(target=countdown, args=(10,), daemon=True) #守护进程
t.start()
方式二,定义线程类,可实现复杂需求(推荐)
class CountdownTask:
    def __init__(self):
        self._running = True

    # 其他辅助方法
    def terminate(self):
        self._running = False

    # 线程执行的内容
    def run(self, n):
        while self._running and n > 0:
            print('T-minus', n)
            n -= 1
            time.sleep(5)

c = CountdownTask()
t = Thread(target=c.run, args=(10,))
# t = Thread(target=countdown, args=(10,), daemon=True) #守护进程
t.start()
c.terminate() # 终止信号
t.join()      # Wait for actual termination (if needed)
方式三,继承 Thread 函数
from threading import Thread

class CountdownThread(Thread):
    def __init__(self, n):
        super().__init__()
        self.n = n

    def run(self):
        while self.n > 0:

            print('T-minus', self.n)
            self.n -= 1
            time.sleep(5)

c = CountdownThread(5)
c.start()
尽管这样也可以工作,但这使得你的代码依赖于 threading 库,所以你的这些代码只能在线程上下文中使用。
而方式二的代码可以被用在其他的上下文中,可能与线程有关,也可能与线程无关。比如,你可以通过 multiprocessing 模块在一个单独的进程中执行你的代码:
import multiprocessing
c = CountdownTask(5)
p = multiprocessing.Process(target=c.run)
p.start()
守护线程
守护线程一般是一个等待客户端请求服务的服务器。 如果没有客户端请求, 守护线程就是空闲的。 如果把一个线程设置为守护线程,就表示这个线程是不重要的,主线程准备退出时,不需要等待这个子线程执行完成。
启动线程之前执行如下赋值语句: thread.daemon = True(调用 thread.setDaemon(True)的旧方法已经弃用了)。
线程同步
event 对象
TODO
event 对象最好单次使用,就是说,你创建一个 event 对象,让某个线程等待这个对象,一旦这个对象被设置为真,你就应该丢弃它。尽管可以通过 clear() 方法来重置 event 对象,但是很难确保安全地清理 event 对象并对它重新赋值。很可能会发生错过事件、死锁或者其他问题(特别是,你无法保证重置 event 对象的代码会在线程再次等待这个 event 对象之前执行)。如果一个线程需要不停地重复使用 event 对象,你最好使用 Condition 对象来代替。
Condition 对象
TODO
event对象的一个重要特点是当它被设置为真时会唤醒所有等待它的线程。如果你只想唤醒单个线程,最好是使用信号量或者 Condition 对象来替代
锁
I/O 和访问相同的数据结构都属于临界区,因此需要用锁来防止多个线程同时进入临界区。为了加锁,需要添加一行代码来引入Lock(或RLock),然后创建一个锁对象。当情况更加复杂,你可能需要一个更强大的同步原语来代替锁。
Lock 对象和 with 语句块一起使用可以保证互斥执行,每次只有一个线程可以执行 with 语句包含的代码块。with 语句会在这个代码块执行前自动获取锁,在执行结束后自动释放锁。相当于lock.acquire();... lock.release()。相比于这种显式调用的方法,with 语句更加优雅,也更不容易出错,特别是程序员可能会忘记调用 release() 方法或者程序在获得锁之后产生异常这两种情况(使用 with 语句可以保证在这两种情况下仍能正确释放锁)。
Lock的最佳实践
import threading

class SharedCounter:
    '''
    利用这个类,将需要共享的数据、锁都封装起来,暴露给线程的只有方法,是一种非常好的实现方法。
    '''
    def __init__(self, initial_value = 0):
        self._value = initial_value
        self._value_lock = threading.Lock()

    def incr(self,delta=1):
        '''
        Increment the counter with locking
        '''
        with self._value_lock:
             self._value += delta

    def decr(self,delta=1):
        '''
        Decrement the counter with locking
        '''
        with self._value_lock:
             self._value -= delta
RLock可重入锁
一个 RLock (可重入锁)可以被同一个线程多次获取,主要用来实现基于监测对象模式的锁定和同步。在使用这种锁的情况下,当锁被持有时,只有一个线程可以使用完整的函数或者类中的方法。
与一个标准的锁不同的是,已经持有这个锁的方法在调用同样使用这个锁的方法时,无需再次获取锁。比如 下面的decr 方法。 这种实现方式的一个特点是,无论这个类有多少个实例都只用一个锁。因此在需要大量使用计数器的情况下内存效率更高。不过这样做也有缺点,就是在程序中使用大量线程并频繁更新计数器时会有争用锁的问题。
import threading

class SharedCounter:
    '''
    A counter object that can be shared by multiple threads.
    '''
    _lock = threading.RLock()   # 所有类的实例共享的一个类级锁
    def __init__(self, initial_value = 0):
        self._value = initial_value

    def incr(self,delta=1):
        '''
        Increment the counter with locking
        '''
        with SharedCounter._lock:
            self._value += delta

    def decr(self,delta=1):
        '''
        Decrement the counter with locking
        '''
        with SharedCounter._lock:
             self.incr(-delta)
信号量
threading 模块包括两种信号量类:Semaphore 和 BoundedSemaphore。如你所知,信号量实际上就是计数器,它们从固定数量的有限资源起始。
相对于简单地作为锁使用,信号量更适用于那些需要在线程之间引入信号或者限制的程序。比如,你需要限制一段代码的并发访问量,你就可以像下面这样使用信号量完成:
from threading import Semaphore
import urllib.request

# 运行 5 个线程并发
_fetch_url_sema = Semaphore(5)

def fetch_url(url):
    with _fetch_url_sema:
        return urllib.request.urlopen(url)
线程通信
从一个线程向另一个线程发送数据最安全的方式可能就是使用 queue 库中的队列了。创建一个被多个线程共享的 Queue 对象,这些线程通过使用 put() 和 get() 操作来向队列中添加或者删除元素。
Queue 模块
使用 Queue 模块(Python 2.x 版本,在Python 3.x版本中重命名为queue)来提供线程间通信的机制,Queue 对象已经包含了必要的锁,所以你可以通过它在多个线程间多安全地共享数据。通过使用 put() 和 get() 操作来向队列中添加或者删除元素。
生产者和消费者
关于消费者的关闭问题解决方法是在队列中放置一个特殊的值,当消费者读到这个值的时候,终止执行。
from queue import Queue
from threading import Thread

# Object that signals shutdown
_sentinel = object()

# A thread that produces data
def producer(out_q):
    while running:
        # Produce some data
        ...
        out_q.put(data)

    # Put the sentinel on the queue to indicate completion
    out_q.put(_sentinel)

# A thread that consumes data
def consumer(in_q):
    while True:
        # Get some data
        data = in_q.get()

        # Check for termination
        if data is _sentinel:
            in_q.put(_sentinel) # 将这个标注放回队列,然后结束当前进程
            break

        # Process the data
        ...
队列流量控制与非阻塞
在创建 Queue 对象时提供可选的 size 参数来限制可以添加到队列中的元素数量。对于“生产者”与“消费者”速度有差异的情况,为队列中的元素数量添加上限是有意义的。比如,一个“生产者”产生项目的速度比“消费者” “消费”的速度快,那么使用固定大小的队列就可以在队列已满的时候阻塞队列,以免未预期的连锁效应扩散整个程序造成死锁或者程序运行失常。
get() 和 put() 方法都支持非阻塞方式和设定超时,这些操作都可以用来避免当执行某些特定队列操作时发生无限阻塞的情况。
import queue
q = queue.Queue()

try:
    data = q.get(block=False) # 非阻塞式
except queue.Empty:
    ...

try:
    data = q.get(timeout=5.0) # 超时
except queue.Empty:
    ...

try:
    q.put(item, block=False) # 非阻塞
except queue.Full:
    log.warning('queued item %r discarded!', item)
    ...
不安全的一些方法
你最好不要在你的代码中使用这些不是线程安全的方法: q.qsize() , q.full() , q.empty() 获取一个队列的当前大小和状态。因为可能你对一个队列使用 empty() 判断出这个队列为空,但同时另外一个线程可能已经向这个队列中插入一个数据项。
Condition自定义线程安全的数据结构
尽管队列是最常见的线程间通信机制,但是仍然可以自己通过创建自己的数据结构并添加所需的锁和同步机制来实现线程间通信。最常见的方法是使用 Condition 变量来包装你的数据结构
import threading

class PriorityQueue:
      """
      自定义的优先级队列
      """
    def __init__(self):
        self._queue = []
        self._count = 0
        self._cv = threading.Condition()
    def put(self, item, priority):
        with self._cv:
            heapq.heappush(self._queue, (-priority, self._count, item))
            self._count += 1
            self._cv.notify()

    def get(self):
        with self._cv:
            while len(self._queue) == 0:
                self._cv.wait()
            return heapq.heappop(self._queue)[-1]
双向通信
使用队列来进行线程间通信是一个单向、不确定的过程。通常情况下,你没有办法知道接收数据的线程是什么时候接收到的数据并开始工作的。下面提供 2 种解决办法
方式一:队列对象提供一些基本完成的特性
from queue import Queue
from threading import Thread

# A thread that produces data
def producer(out_q):
    while running:
        # Produce some data
        ...
        out_q.put(data)

# A thread that consumes data
def consumer(in_q):
    while True:
        # Get some data
        data = in_q.get()

        # Process the data
        ...
        # 提示队列,消费者数据处理完成
        in_q.task_done()

# Create the shared queue and launch both threads
q = Queue()
t1 = Thread(target=consumer, args=(q,))
t2 = Thread(target=producer, args=(q,))
t1.start()
t2.start()

# Wait for all produced items to be consumed
q.join()
方式二:
from queue import Queue
from threading import Thread, Event

# A thread that produces data
def producer(out_q):
    while running:
        # Produce some data
        ...
        # 将 (data, event) 元组放入队列中
        evt = Event()
        out_q.put((data, evt))
        ...
        # 等待消费者通知
        evt.wait()

# A thread that consumes data
def consumer(in_q):
    while True:
        # 获取到数据和 Event 对象
        data, evt = in_q.get()
        # Process the data
        ...
        # 通知消费者数据处理完成
        evt.set()
数据深拷贝
使用线程队列有一个要注意的问题是,向队列中添加数据项时并不会复制此数据项,线程间通信实际上是在线程间传递对象引用。如果你担心对象的共享状态,那你最好只传递1)不可修改的数据结构(如:整型、字符串或者元组)或者2)一个对象的深拷贝。
使用 copy 模块进行深拷贝
from queue import Queue
from threading import Thread
import copy  # 使用 copy 模块

# A thread that produces data
def producer(out_q):
    while True:
        # Produce some data
        ...
        out_q.put(copy.deepcopy(data)) # 深拷贝

# A thread that consumes data
def consumer(in_q):
    while True:
        # Get some data
        data = in_q.get()
        # Process the data
死锁问题TODO
https://python3-cookbook.readthedocs.io/zh_CN/latest/c12/p05_locking_with_deadlock_avoidance.html
线程本地存储对象 TODO
https://python3-cookbook.readthedocs.io/zh_CN/latest/c12/p06_storing_thread_specific_state.html
线程池
concurrent.futures 函数库有一个 ThreadPoolExecutor 类可以被用来完成这个任务。通常应该避免编写线程数量可以无限制增长的程序。
from socket import AF_INET, SOCK_STREAM, socket
from concurrent.futures import ThreadPoolExecutor

def echo_client(sock, client_addr):
    '''
    Handle a client connection
    '''
    print('Got connection from', client_addr)
    while True:
        msg = sock.recv(65536)
        if not msg:
            break
        sock.sendall(msg)
    print('Client closed connection')
    sock.close()

def echo_server(addr):
      """
      服务器线程
      """
    pool = ThreadPoolExecutor(128)  # 定义线程池大小
    sock = socket(AF_INET, SOCK_STREAM)
    sock.bind(addr)
    sock.listen(5)
    while True:
        client_sock, client_addr = sock.accept()
        pool.submit(echo_client, client_sock, client_addr)

echo_server(('',15000))
对比手动实现线程池,如果你想手动创建你自己的线程池, 通常可以使用一个Queue来轻松实现。
from socket import socket, AF_INET, SOCK_STREAM
from threading import Thread
from queue import Queue

def echo_client(q):
    '''
    Handle a client connection
    '''
    sock, client_addr = q.get()  # 阻塞性等待
    print('Got connection from', client_addr)
    while True:
        msg = sock.recv(65536)
        if not msg:
            break
        sock.sendall(msg)
    print('Client closed connection')

    sock.close()

def echo_server(addr, nworkers):
    # Launch the client workers,区别的地方
    q = Queue()
    for n in range(nworkers):
        t = Thread(target=echo_client, args=(q,))
        t.daemon = True
        t.start()

    # Run the server
    sock = socket(AF_INET, SOCK_STREAM)
    sock.bind(addr)
    sock.listen(5)
    while True:
        client_sock, client_addr = sock.accept()
        q.put((client_sock, client_addr)) # 区别的地方

echo_server(('',15000), 128)
使用 ThreadPoolExecutor 相对于手动实现的一个好处在于它使得 任务提交者更方便的从被调用函数中获取返回值。
from concurrent.futures import ThreadPoolExecutor
import urllib.request

def fetch_url(url):
    u = urllib.request.urlopen(url)
    data = u.read()
    return data

pool = ThreadPoolExecutor(10)
# Submit work to the pool
a = pool.submit(fetch_url, 'http://www.python.org')
b = pool.submit(fetch_url, 'http://www.pypy.org')

# Get the results back
x = a.result()
y = b.result()
例子中返回的handle对象会帮你处理所有的阻塞与协作,然后从工作线程中返回数据给你。 特别的,a.result() 操作会阻塞进程直到对应的函数执行完成并返回一个结果。
多进程
由于 Python 的 GIL 的限制,多线程更适合于 I/O 密集型应用(I/O 释放了 GIL,可以允 许更多的并发),而不是计算密集型应用。对于后一种情况而言,为了实现更好的并行性,我们有两种策略来解决GIL的缺点。
方法一:如果你完全工作于Python环境中,你可以使用 multiprocessing 模块来创建一个进程池, 并像协同处理器一样的使用它
# Processing pool (see below for initiazation)
pool = None

# CPU 密集性的任务
def some_work(args):
    ...
    return result

# 在线程中调用进程池
def some_thread():
    while True:
        ...
        r = pool.apply(some_work, (args))
        ...

# Initiaze the pool
if __name__ == '__main__':
    import multiprocessing
    pool = multiprocessing.Pool()
这个通过使用一个技巧利用进程池解决了GIL的问题。 当一个线程想要执行CPU密集型工作时,会将任务发给进程池。 然后进程池会在另外一个进程中启动一个单独的Python解释器来工作。 当线程等待结果的时候会释放GIL。 并且,由于计算任务在单独解释器中执行,那么就不会受限于GIL了。 在一个多核系统上面,你会发现这个技术可以让你很好的利用多CPU的优势。
方法二:另外一个解决GIL的策略是使用C扩展编程技术。这里不做讨论。
如果你准备使用一个进程池,注意的是这样做涉及到数据序列化和在不同Python解释器通信。
- 被执行的操作需要放在一个通过
def语句定义的Python函数中,不能是lambda、闭包可调用实例等, 并且函数参数和返回值必须要兼容pickle。 - 同样,要执行的任务量必须足够大以弥补额外的通信开销。
jupyter 的 bug
jupyter的setDeamon有bug,setDaemon(True)在jupyter中会主进程会等待子进程结束。这是有问题的。
setDaemon() : 设置此线程是否被主线程守护回收,需要在 start 方法前调用。
- 默认
False不回收,也就是主进程运行到最后一行后,会等待子进程结束; - 设为
True相当于向主线程中注册守护,主线程结束时会将其一并回收,子进程不论是否运行完成
import threading
import time
class MyThread(threading.Thread):
    def __init__(self,id):
        threading.Thread.__init__(self)
        self.id=id
    def run(self):
        for _ in range(5):
            time.sleep(2)
            print("this is " + str(self.id)+ self.getName())

if __name__ == "__main__":
    t1 = MyThread(999)
    t1.setDaemon(False)
    t1.setDaemon(True)
    t1.start()
    print("I am the father thread")
join(): 设置主线程是否同步阻塞自己来待此子线程执行完毕
- 没有
t.join()时,主进程启动子进程后会继续执行后续代码,然后等待子进程结束(如果没有设置t1.setDaemon(True)) join时,主进程会被阻塞,等待调用了t.join()的子进程t结束。
import threading
import time

class MyThread(threading.Thread):
    def __init__(self, id):
        threading.Thread.__init__(self)
        self.id = id

    def run(self):
        for _ in range(5):
            time.sleep(1)
            print("this is " + str(self.id) + self.getName())

if __name__ == "__main__":
    ts=[]
    for i in range(5):
        ts.append(MyThread(i))
    for t in ts:
        t.start()    #  启动了第1个子进程,之后调用join,主进程就被阻塞,无法启动下一个子进程
        t.join()    #  主进程会卡在这里,一直等待第1个子进程运行结束,才进入下一次循环,启动下一个进程
    print("I am the father thread")
这才是比较正确的做法
import threading
import time

class MyThread(threading.Thread):
    def __init__(self, id):
        threading.Thread.__init__(self)
        self.id = id

    def run(self):
        for _ in range(5):
            time.sleep(1)
            print("this is " + str(self.id) + self.getName())

if __name__ == "__main__":
    ts=[]
    for i in range(5):
        ts.append(MyThread(i))
    for t in ts:
        t.start()    # 启动所有子进程,子进程在后台,主进程继续后面的代码,不会阻塞
    for t in ts:
        print "start"+t.getName()
        t.join()    # 这时候进行join,使得主进程在这里被第一个子进程t阻塞,但是所有子进程都在运行。第一个进程结束后,主进程恢复运行,执行第二个子进程的join,这时的第二个子进程是有可能已经结束了的
    print("I am the father thread")
所以 setDeamon(True)与join共用时应该是没有效果的(我的观点)